HTML is the new HTML5

Few days ago Ian Hickson wrote a blog: HTML is the new HTML5, he referred “we moved to a new development model“, and comes with two major changes:

  1. The HTML specification will henceforth just be known as “HTML”, with the URL http://whatwg.org/html.
  2. The WHATWG HTML spec now became “living standard“, “It’s more mature than any version of the HTML specification”. I took a screenshot below:

HTML Living Standard

So, in a simple sentence: HTML is going to “unversioned model“, according to this there is definitely a concern: OK, living standard? Does this mean the standard could be changed/updated/revised at anytime? I saw one person asked posted this question and Ian Hickson replied, he emphasized WHATWG worked hard on backward-capability, and they worked tightly with browser vendors to make sure they do not change things that most people depend on, this is good and really important!

So, things is getting more and more interesting with HTML 5 (should I just call HTML?), few days before (18 January 2011) W3 just “unveiled” the HTML 5 logo: http://www.w3.org/News/2011#entry-8992, I bet there could be more or less confusion:)

Unique URL in Ajax Web Application

Background

Few days ago one of my friend asked me how does Gmail change its URL while user operates inside it without page refreshing, I’ve no idea about that, he then shared a link Ajax Pattern – Unique URLs which deep dives into this topic, as the article mentioned: Unique URL make your website’s link “Bookmarkable, Linkable, Type-In-Able”, plus Sharable IMHO, easy to be shared to Social network which is extremely important nowadays.

Implementation

The key technology to achieve the “”Unique URL” goal could be summarized into two points:

  1. If the content in the page has been updated by Ajax significantly enough, update the URL (location.hash) as well.
  2. // Ajax rendering all blog entries in page number 5
    location.hash = 'Blogs&Page5';
  3. Every time the Ajax page loads, JS should understand the URL and render related content as well.
  4. <body onload="restoreAjaxContent()">
    <script type="text/javascript">
    function restoreAjaxContent(){
        var urlHash = location.hash;
        var curPageNo = urlHash.replace('Blogs&Page','');
        // Safe parse curPageNo into number, handles wrong parameters (Ignored for here)
        // Display loading text/image on the page (optional but better UX).
        // Ajax rendering all blog entries in page number curPageNo.
    }
    </script>
    </body>

What I want to emphasize is the hash value, i.e. the content behind # is originally expected an HTML element’s name attribute used for In-Page navigation, it is completely the contract between client Browser, HTML content and JavaScript, server side cannot get the information directly except we explicitly pass the value to the server side (hidden post, URL query string, Ajax etc), therefore,if some user access the unique URL, your website’s client side JS should parse the hash and retrieve relevant data from server side.

Pros & Cons

Advantage

  1. Better user experience.
    Every time user accesses the unique URL Ajax page, the fixed part of this page loaded first, and then loads the main content asynchronously, if the main content is large enough, for example, contains images or rich media content, the “async loading” is much better than the page loading blocked by downloading those images/medias.
    For instance, originally loading one specific page requires 2 seconds totally, after applying the this “async loading“,  the fixed part cost 0.4 seconds to be loaded and the main content costs 1.8 seconds, from user’s point of view,  usually the latter case would be better because the user see your page is partially loaded within a short period (0.4) which feels good enough, plus a graceful loading/splash screen, eventually the UX got improved significantly!
  2. Better SEO support (Performance Aspect)
    The page rendering speed is an important fact for a search engine’s crawler, by applying “async loading”, the crawler will deem the page it is crawling has a good loading speed – 0.4 seconds.
  3. Easy to support W3 web standard
    This is sort of kidding:) Since your main content is Ajax loaded, W3 validator (so does Search Engine) won’t validate the main content which is very possible does not strictly adhere all the standard rules.

Disadvantage

  1. Main content cannot be indexed by Search engines
    All main content is loaded by JavaScript, Search engine won’t crawler those content, this is a serious problem! However, it is easy to walk around, builds a traditional page without Ajax, store it into sitemap.xml and submit to search engine Web Master tool.
  2. Harder to development and to maintain
    Client JavaScript/Ajax development is more complex and less convenient comparing to server side technology like ASP.NET, JAVA EE or PHP.  Although there are jQuery (write less, do more), Prototype.js (make develop JS in a more OO way), DoJo and so on, it still might not be very happy while a developer is struggling with mixed HTML/CSS/JavaScript:)

P.S. I spent two days in updating my blog (http://WayneYe.com), revised the paging style from traditional into the Ajax Unique URL pattern above, it is no doing Ajax paging and update URL like “http://wayneye.com/#Blogs&Page5“, it definitely “Bookmarkable, Linkable, Type-In-Able and Sharable“, plus a loading panel and content fades in effect, I believe its UX is much better than before.

IP address to geolocation

Background

Few months ago I found an interesting website: http://ipinfodb.com/, it provided API which could “translate” any IP Address into a geography location including City/Region/Country as well as latitude/longitude and time zone information, to invoke its API, a registered API key is required (which is free).  Since beforehand I stored visitor’s IP Addresses into my own database, I decided to utilize InfoDB API to store visitor’s GEO locations.

Just few days ago, I casually emitted an idea: summarize those GEO location records and display them on Google Map, hum, it is feasible:)

So, the process is: Track visitor’s IP addresses -> “Translate” them to Geography location -> Show them on Google Map!

(PS, I’ve been using Google Analytics for my Geek Place – http://WayneYe.com for more than two years, it is no double extremely powerful, and it already contains a feature “Map Overlay“, however, due to privacy policy, Google Analytics does NOT display visitor’s IP address, they explained this at: http://www.google.com/support/analytics/bin/answer.py?hl=en&answer=86214).

Implementation

The first task I need to do is track visitor’s IP Address, most of the time, user visits a website in browser submits an HTTP GET request (an HTTP data package) based on Transmission Control Protocol (not all the time) , browser passed the ball to DNS server(s), after several times “wall passes”, the original request delivered to the designation – the web server, during the process, the original Http request was possibly transferred through a number of routers/proxies and many other stuff, the request’s header information might have been updated: Via (Standard HTTP request header) or X-Forwarded-For (non-standard header but widely used), could be the original ISP’s information/IP Address OR possibly one of the proxy’s IP Address.

So, usually the server received the request and saw Via/X-Forwarded-For header information, it got to know visitor’s IP address (NOT all the time, some times ISP’s IP address), in ASP.NET, it is simply to call Request.UserHostAddress, however, we can never simply trust this because of two major reasons:

  1. Malicious application can forge HTTP request, if you are unlucky to trust it and have it inserted into Database, then SQL Injection hole will be utilized by Malicious application.
  2. Not all the visitors are human being, part of them (sometimes majority of them, for example, my website has very few visitors per week while a number of “robot visitors”^_^) could be search engine crawlers, I must distinguish human visitors and crawlers, otherwise I would be happy to see a lot of “visitors” came from “Mountain View, CA” ^_^.

For #1: I use regular expression to validate the string I got from Request.UserHostAddress:

public static Boolean IsValidIP(string ip)
{
    if (System.Text.RegularExpressions.Regex.IsMatch(ip, "[0-9]{1,3}\\.[0-9]{1,3}\\.[0-9]{1,3}\\.[0-9]{1,3}"))
    {
        string[] ips = ip.Split('.');
        if (ips.Length == 4 || ips.Length == 6)
        {
            if (System.Int32.Parse(ips[0]) < 256 && System.Int32.Parse(ips[1]) < 256
                & System.Int32.Parse(ips[2]) < 256 & System.Int32.Parse(ips[3]) < 256)
                return true;
            else
                return false;
        }
        else
            return false;
    }
    else
        return false;
}

If the result is “0.0.0.0”, I will ignore it.

For #2, so far I haven’t found a “perfect way” to solve this issue (and I guess there might be no perfect solution to identify all the search engines in the world, please correct me if I am wrong); However, I’ve defined two rules to try my best to identify them for general and normal situations:

Rule #1:

Request which contains “Cookie” Header with “ASP.NET_SessionIdAND its value is equal with server side, then it should be a normal user who has just visited my website within the one session.

Notes: there might be two exceptions for rule #1,

  1. If user’s browser has disabled Cookie then this rule will NOT be effective since the client request will never contain a Cookie header since the browser disabled it.
  2. Assume there is a crawler who crawls my website and accept storing cookie, then #1 will not be effective. However, I don’t think a crawler will firstly request a SessionID and then request again using the same SessionID).

Rule #2:

Define a crawler list and analyses whether “User-Agent” header contains one of them, the list should be configurable. Refer more Crawler example at: http://en.wikipedia.org/wiki/Web_crawler#Examples_of_Web_crawlers

Talk is cheap, show me the code, I wrote a method to identify crawlers by applying two rules above.

public static Boolean IsCrawlerRequest()
{
    // Rule 1: Request which contains "Cookie" Header with "ASP.NET_SessionId" and its value is equal with server side, 
    // then it should be a normal user (except maliciously forging, I don't think a crawler will firstly request a sessionID and then request again with the SessionID).
    //if (HttpContext.Current.Request.Cookies["ASP.NET_SessionId"] != null
    //    && HttpContext.Current.Request.Cookies["ASP.NET_SessionId"].Value == HttpContext.Current.Session.SessionID)
    if (HttpContext.Current.Request.Headers["Cookie"] != null
        && HttpContext.Current.Request.Headers["Cookie"].Contains("ASP.NET_SessionId"))
        return false;  // Should be a normal user browsing my website using a browser.

    // Rule 2: define a crawler list and analyses whether "User-Agent" header contains one of them, this should be configurable
    // Refer more Crawler example at: http://en.wikipedia.org/wiki/Web_crawler#Examples_of_Web_crawlers
    var crawlerList = new String[] { "google", "bing", "msn", "yahoo", "baidu", "soso", "sogou", "youdao" };

    if (!String.IsNullOrEmpty(HttpContext.Current.Request.UserAgent))
        foreach (String bot in crawlerList)
            if (HttpContext.Current.Request.UserAgent.ToLower(CultureInfo.InvariantCulture).Contains(bot))
                return true; // It is a crawler

    return false;
}

Please be aware that I commented out HttpContext.Current.Request.Cookies["ASP.NET_SessionId"] != null, since I found that Request.Cookie will ALWAYS contain “ASP.NET_SessionId” EVENT IF the browser disabled Cookie storing, I will do further investigation and double check later!

Ok, now we get normal users’ IP Addresses and filtered search engine crawlers, the next step is invoking InfoDB API to “translate” IP Address to Geolocation, you need register an API KEY here, and then submit an HTTP GET request to:

http://api.ipinfodb.com/v2/ip_query.php?key=%5BAPI KEY]&ip=[IP Address]&timezone=false

It returns XML below, I take IP=”117.136.8.14″ for example:

<?xml version="1.0" encoding="UTF-8"?>
<Response>
  <Status>OK</Status>
  <CountryCode>CN</CountryCode>
  <CountryName>China</CountryName>
  <RegionCode>23</RegionCode>
  <RegionName>Shanghai</RegionName>
  <City>Shanghai</City>
  <ZipPostalCode></ZipPostalCode>
  <Latitude>31.005</Latitude>
  <Longitude>121.409</Longitude>
  <Timezone>0</Timezone>
  <Gmtoffset>0</Gmtoffset>
  <Dstoffset>0</Dstoffset>
  <TimezoneName></TimezoneName>
  <Isdst></Isdst>
  <Ip>117.136.8.14</Ip>
</Response>

Wow, looks precise:), I am going to show visitor’s geolocation on Google Map (I know this compromises visitor’s privacy but my personal blog http://WayneYe.com is not a company and I will NEVER earn a cent by doing this:)).

Anyway, I use the latest Google Map JavaScript API V3, and there are two major functionalities:

1. Display visitor’s Geolocation as long as user’s browser support “navigator.geolocation” property (Google Chrome, Mozilla Filefox support it, IE not support), default location will be set to New York City if the browser does not support this W3 recommended standard, a sample below (I used Google Chrome):

VisitorInfo

I am now living in Shanghai

2. Display a specified blog’s visitors’ geolocations on Google Map, screenshot below shows the visitors’ geolocations who visited my blog: My new Dev box – HP Z800 Workstation, by clicking each geolocation, it will show on Google Map.

Visitors of <My new Dev box - HP Z800 Workstation>

Visitors of <My new Dev box - HP Z800 Workstation>

The JavaScript code showing below:

<script type="text/javascript">
    var initialLocation;
    var newyork = new google.maps.LatLng(40.69847032728747, -73.9514422416687);
    var browserSupportFlag = new Boolean();
    var map;
    var myOptions
    var infowindow = new google.maps.InfoWindow();

    function initialize() {
        myOptions = {
            zoom: 6,
            mapTypeId: google.maps.MapTypeId.ROADMAP
        };
        map = new google.maps.Map(document.getElementById("googleMapContainer"), myOptions);

        // Try W3C Geolocation (Preferred)
        if (navigator.geolocation) {
            browserSupportFlag = true;
            navigator.geolocation.getCurrentPosition(function (position) {
                map.setCenter(new google.maps.LatLng(position.coords.latitude, position.coords.longitude));
                infowindow.setContent('Hi, dear WayneYe.com visitor! You are here:)');
                infowindow.setPosition(new google.maps.LatLng(position.coords.latitude, position.coords.longitude));
                infowindow.open(map);
            }, function () {
                handleNoGeolocation(browserSupportFlag);
            });
        } else {
            browserSupportFlag = false;
            handleNoGeolocation(browserSupportFlag);
        }

        function handleNoGeolocation(errorFlag) {
            //contentString = 'Cannot track your location, default to New York City.';

            map.setCenter(newyork);
            //infowindow.setContent(contentString);
            //infowindow.setPosition(newyork);
            infowindow.open(map);
        }
    }

    function setGoogleMapLocation(geoLocation, latitude, longitude) {
        contentString = geoLocation;

        var visitorLocation = new google.maps.LatLng(latitude, longitude);

        map.setCenter(visitorLocation);
        infowindow.setContent(contentString);
        infowindow.setPosition(visitorLocation);
        infowindow.open(map);
    }
</script>

My visitor record page is: http://wayneye.com/VisitRecord.

Improve ASP.NET website performance by enabling compression in IIS

GZIP format is developed by GNU Project and standardized by IETF in RFC 1952, which MUST be considered by web developers to improve their websites’ performance, there are several Quintessential articles documented using gzip compression, they are:

10 Tips for Writing High-Performance Web Applications
Best Practices for Speeding Up Your Web Site
How To Optimize Your Site With GZIP Compression
IIS 7 Compression. Good? Bad? How much?

A gzip compressed HTTP package can significantly save bandwidth thus speed up browser rendering after use hitting enter, and user experience got improved finally, nowadays most of the popular browsers such as IE, Firefox, Chrome, Opera support gzip encoded content (please refer: http://en.wikipedia.org/wiki/HTTP_compression).

PS: the other compression encoding is deflate, “but it’s less effective and less popular” (refer: http://developer.yahoo.com/performance/rules.html).

Yahoo uses gzip compression and suggest developers do that:

Compression in IIS

For ASP.NET developer who host website on IIS like me, to achieve this is fairly easy, open IIS manager and select your website, then go to Compression Module. (Apache admins refer here)

IISCompressionModule

Double click and you will see:

IIS supports two kinds of compression:

  • Static Compression
    IIS compress a specific file at first time and only the first time, afterward every time IIS receive request on this file it will return the compressed data.  This is usually used on the files not frequently changing such as a static html file, an rarely changed XML, a Word document or any file doesn’t change frequently.
  • Dynamic Compress
    IIS will do compression EVERY time a client’s request on one specific file, this usually used on some content that often changes, for example, there is a large CSV file generating engine located on the server back end, and suppose to transfer to the client side, we can use dynamica compress.

Scott Forsyth’s pointed out:”Compression is a trade-off of CPU for Bandwidth.”, one of the new feature in IIS 7 is web masters can customize IIS compression strategy based on the actual need, you can modify the applicationHost.config under “%windir%\System32\inetsrv\config”, below is my sample:

<httpCompression staticCompressionEnableCpuUsage="80" dynamicCompressionDisableCpuUsage="80" directory="%SystemDrive%\inetpub\temp\IIS Temporary Compressed Files">
	<scheme name="gzip" dll="%Windir%\system32\inetsrv\gzip.dll" />
	<staticTypes>
		<add mimeType="text/*" enabled="true" />
		<add mimeType="message/*" enabled="true" />
		<add mimeType="application/x-javascript" enabled="true" />
		<add mimeType="application/atom+xml" enabled="true" />
		<add mimeType="application/xaml+xml" enabled="true" />
		<add mimeType="*/*" enabled="false" />
	</staticTypes>
	<dynamicTypes>
		<add mimeType="text/*" enabled="true" />
		<add mimeType="message/*" enabled="true" />
		<add mimeType="application/x-javascript" enabled="true" />
		<add mimeType="*/*" enabled="false" />
	</dynamicTypes>
</httpCompression>

More detailed is described here: http://www.iis.net/ConfigReference/system.webServer/httpCompression

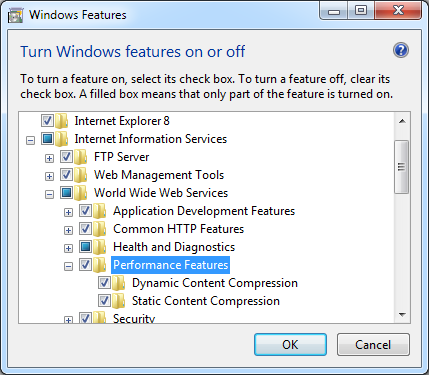
PS, Dynamic Compress is not installed by default, we need install it by turning on Windows Features:

My server host provider uses IIS 6.0 and does NOT enabling compression, I checked compression status for http://wayneye.com by using the free tool provided by port80software and the result is:

WOW, I must convince them to enable gzip compression!!

Programmatically compression using C#

We can also programmatically compress the ASP.NET http response, for example I want to transfer a large CSVfile to the client, a simple ASPX page named ReturnGzipPackage.aspx:

protected void Page_Load(object sender, EventArgs e)
{
    Response.Headers.Add("Content-Disposition", "attachment; filename=IAmLarge.csv");
    Response.ContentType = "text/csv";
    Response.TransmitFile("D:\\IAmLarge.csv");
    Response.End();
}

If the request was submitted by a client browser, browser will automatically decompress the Http package,  but in the Windows client application or Windows Service, we developers can also adopt gzip compression to save bandwidth, once received gzip Http package from the server, we can programmatically decompressing, I wrote a client console application to submit the Http request and receive/decompress the Http response package.

/* Submit Http request to server with Accept-Encoding: gzip */
WebClient client = new WebClient();
// It is mandatory by the client, if this header information is not specified, server will return the original content type, in my case, it is: text/csv
//client.Headers.Add("Accept-Encoding", "gzip");

using(Stream gzipData = client.OpenRead("http://localhost/StudyASPNET/gzipHttp/ReturnGzipPackage.aspx"))
{
    WebHeaderCollection responseHeaders = client.ResponseHeaders;

    using(GZipStream gzip = new GZipStream(gzipData, CompressionMode.Decompress))
    {
        using(StreamReader reader= new StreamReader(gzip))
        {
            String content = reader.ReadToEnd();
            File.WriteAllText("D:\\Downloaded.csv", content);
        }
    }
}

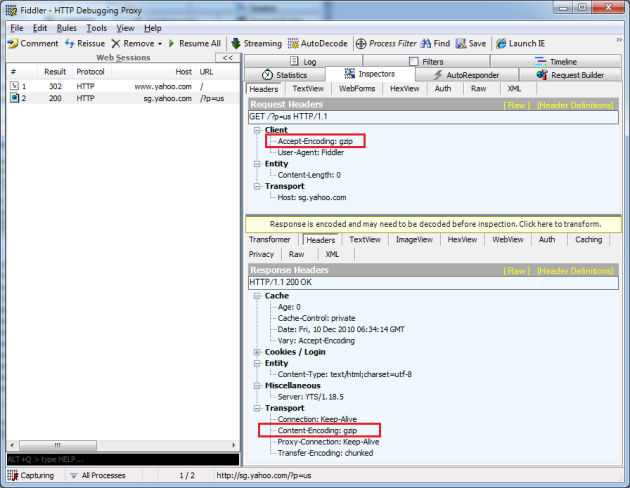
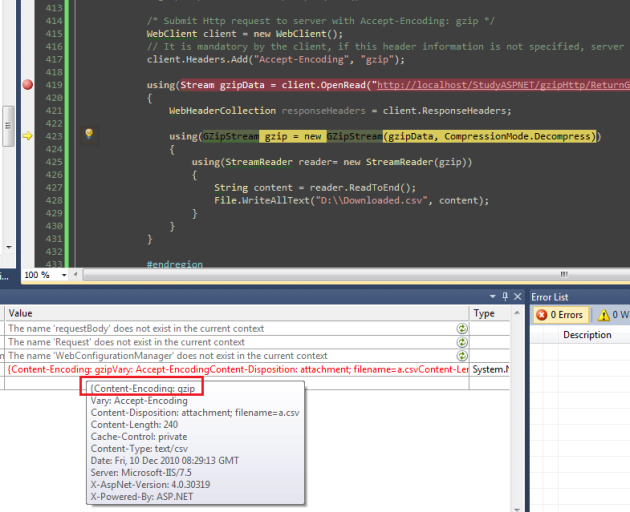
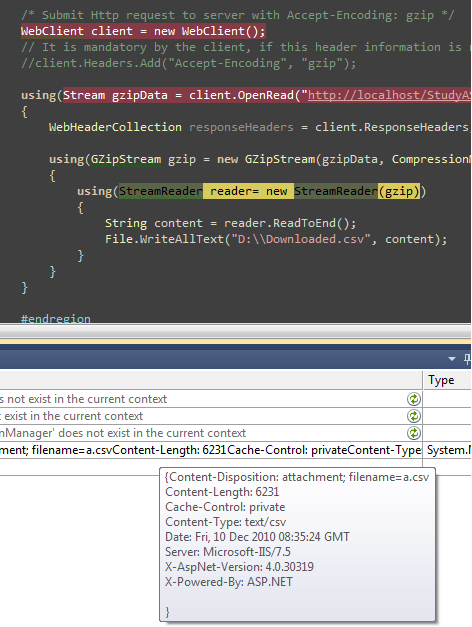
Please be aware of one thing: “Accept-Encoding: gzip” is supported by all browsers by default, i.e. browser will automatically decompresses compressed Http package, so in the code we MUST explicitly specify “Accept-Encoding: gzip“, below is what I investigated:

First time, I explicitly set “Accept-Encoding: gzip”, the Http response header contains “Content-Encoding: gzip“, and the depression/file saving operations complete without any issues.

Second time, I commented out the code, the result is, received Http headers does NOT contain content encoding information, since the server deemed you doesn’t accept gzip encoded content, it won’t return you compressed file, instead, it returned the original file, in my case, the csv file itself.

Conclusion & Hints

Using Http Compression is one of the best practice to speed up the web sites, usually consider compress files like below:

  1. Doesn’t change frequently.
  2. Has a significant compress-rate such as Html, XML, CSV, etc.
  3. Dynamically generated and the server CPU has availability.

Please be aware that do NOT compress JPG, PNG, FLV, XAP and those kind of image/media files, since they are already compressed, compress them will waste CPU resources and you got a compressed copy with few KBs reduced:)

Microsoft Desktop Player

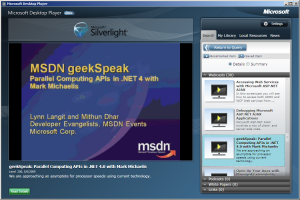
MSDN TechNet Flash has announced Microsoft Desktop Player, now it is in Beta, it can be accessed through the official website which is Silverlight based:

http://www.microsoft.com/click/desktopplayer/

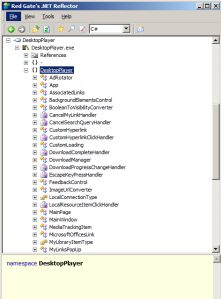
I also installed the desktop version, the desktop version is not a Silverlight OOB, instead, it is a traditional Winform, see screenshot below:

Click to see large image

Click to see large image


Microsoft ALWAYS offer developers strong and great support/guidance, this point is really respected!

Study EVM (Earned Value Management) – 2

Once the CPI/SPI were calculated at some time-stamp, project manager should be deeper analyses, he need to predict the future cost:

ETC (Estimate To Completion)

Then EAC (Estimate At Completion) = AC + ETC

How to calculate ETC based on current situation (EV/AC/PV and SPI&CPI), there are usually three methods:

  1. Regardless of current Schedule/Cost Performance Index
    This way is simple, I don’t care what’s happened, EAC = BAC + EAC – AC, in other words, project team is confident to finish the project below estimated cost.
  2. Estimated based on current CPI
    This way is straight-forward, review current CPI and estimate future cost based on it:
    EAC = AC + (BAC -EV)/CPI = BAC / CPI
  3. Consider both CPI/SPI impact
    I think this way the rationalist one, it consider both SPI and CPI, in additional, PM could give a “weight” to SPI or CPI according to his/her experience and judgement, so the formula is:
    EAC  = (BAC – EV) / (CPI * SPI)

No matter which method PM chooses, as long as the calculated/predicted EAC is not acceptable, then it is an “early warning” to the team.

Even more, PM need calculate TCPI, the content below as copied from EVM on Wikipedia, it is very clear for me.

The To Complete Performance Index (TCPI) provides a projection of the anticipated performance required to achieve either the BAC or the EAC.

For the TCPI based on BAC (describing the performance required to meet the original BAC budgeted total):
TCPI_{BAC} = { BAC - EV \over BAC - AC }
or for the TCPI based on EAC (describing the performance required to meet a new, revised budget total EAC):
TCPI_{EAC} = { BAC - EV \over EAC - AC }
Independent estimate at completion (IEAC)
The IEAC is a metric to project total cost using the performance to date to project overall performance. This can be compared to the EAC, which is the manager’s projection.
IEAC = \sum AC + { \left( BAC - \sum EV \right) \over CPI }

Wish I success, again!  +U!

Study EVM (Earned Value Management) – 1

During the past few days I was studying Project Time Management in PMBOK, for preparing the upcoming PMP exam on 4th December 2010, while I spent a few hours on understanding/mastering EVM, I log my memory hereSmile

EVM stands for Eearned Value Management, it is a complementary for Critical Path Method schedule management, its purpose could be described as “What did we get for the money we spent?” the definition of is in Wikipedia is below:

Earned value management (EVM) is a project management technique for measuring project progress in an objective manner. EVM has the ability to combine measurements of scope, schedule, and cost in a single integrated system. When properly applied, EVM provides an early warning of performance problems. Additionally, EVM promises to improve the definition of project scope, prevent scope creep, communicate objective progress to stakeholders, and keep the project team focused on achieving progress.

There are three fundamental glossaries in EVM, they are:

  • PV Plan Value (also called BCWS – Badget Cost for Work Scheduled)
  • AC Actual Cost (also called ACWP – Actual Cost for Work Performed)
  • EV Earned Value (also called BCWP Badget Cost for Worked Performed), so
    EV = BAC (Budget At Completion) * [Finished work]%
    EV formula from Wikipedia:

EV

For simple and straight-forward, in my understanding:

  • PV is on a specified timestamp, what is the planed budget.
  • AC is on a specified timestamp, what is the actual cost.
  • EV is on a specified timestamp, how much percent of work has been done while how much cost was expected.
    During the project implementing process, Program Manager tracks the schedule and cost using EVM, and calculate SV&SV, SPI&CPI, they are:

SV Schedule Variance
SV = EV – PV
CV Cost Variance
CV = EV – AC

SPI Schedule Performance Index
SPI = EV/PV
CPI Cost Performance Index
CPI = EV/CV

I take a simple example for better understanding, assume I am managing a 10 days project code name “Lambda”, Lambda project has a BAC of $100, and the detailed project schedule was determined below:

Day# 1 2 3 4 5 6 7 8 9 10
Budget $10 $10 $10 $10 $10 $10 $10 $10 $10 $10

The scenario is at the end of day 3, I (PM) called up team member and held a meeting to track status, we found:

We got 40% of the entire work done, on the other hand, we’ve already spent $60, based on this fact, I (PM) will get to know:

PV: 3 days past, initially we planed/supposed to spend $30 according to the schedule, so PV=30.
AC: We’ve spent &60, so AC=60.
EV: we finished 40% of work, initially we planed/supposed to spend $40 to get 40% work done, so EV=40

OK, then:

SV = EV – PV = 40 – 30 = 10, greater than 0, it is good, we are ahead scheduleSmile
CV = EV- CV = 40 – 60 = -20, smaller than 0, it is not good, we are overspending moneySad smile

SPI = EV/PV = 40/30 = 1.3 > 1 greater than 1, good.
CPI = EV/CV = 40/60 = 0.66 < 1, smaller than 1, not good.

+U+U to myself, I put a flag here, I believe I will pass the exam!

References

EVM on Wikipedia
http://en.wikipedia.org/wiki/Earned_value_management

EVM official web site
http://www.earnedvaluemanagement.com/

Elevated trust in Silverlight 4

Background

In Silverlight 4, Out Of Browser with elevated permission is significantly improved, now the OOB application has more privilege in accessing system resources such as the ability of accessing Isolated Storage, manipulating COM objects, access local registry entries, or even invoke Microsoft Speech API to phonate.

Essentially, to achieve this, the main improvements are:

  1. Microsoft gives Silverlight 4 OOB applications ability to request elevated trust.

    From Trusted Applications
    You can configure out-of-browser applications to require elevated trust. After installation, these trusted applications can bypass some of the restrictions of the security sandbox. For example, trusted applications can access user files and use full-screen mode without keyboard restrictions.

  2. A new concept coming from .NET 4.0 called “late binding”, the C# key word: dynamic could be use to declare a undetermined type at build time, during runtime, Microsoft.CSharp.RuntimeBinder will do dynamically building.

Introduction

My post is going to concentrated discuss about elevated trust, so read the articles below if you have any issues about creating OOB and request elevated permission.

How to: Configure an Application for Out-of-Browser Support
How to Configure your Silverlight App to run in Elevated Trust Mode

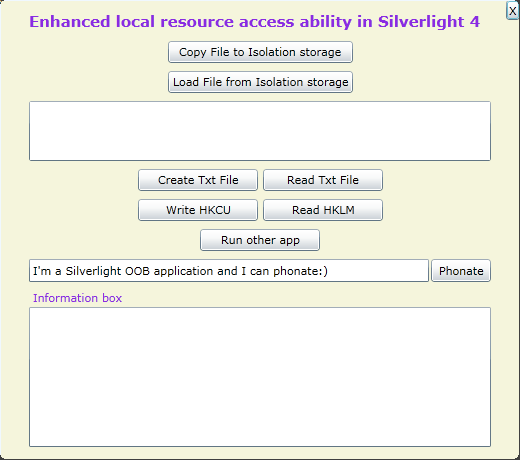
I developed a simple Silverlight OOB demo, it will access local system resources including:

  • Let user choose some file(s) and then copy them to isolated storage.
  • Access isolated storage enumerate all files.
  • Create a txt file under drive C: by invoking “Scripting.FileSystemObejct”, as well as read its content back.
  • Write registry entry under HKEY_CURRENT_USER, read registry entry under HKEY_LOCAL_MACHINE, by using “WScript.Shell”.
    Note: Silverlight OOB application will NOT have write permission to HKLM, it only have read permission.
  • Run another executable files located on the system by using “WScript.Shell”.
  • Phonate a sentence user input into the textbox.

Screenshot

After installing on the system, its UI is shown below (I know it is really poor… SorrySmile):
MainPage

Implementation

The elevated permission ONLY enabled in Out Of Brower scenario, so in our Silverlight application we need check whether currently it is running out of browser:

if(Application.Current.IsRunningOutOfBrowser)
    // Access local file, registry, COM, etc.

In additional, to invoke COM objects, we need check whether AutomationFactory is available:

if (AutomationFactory.IsAvailable)

OK here we go to see the code behind to implement elevated permission.

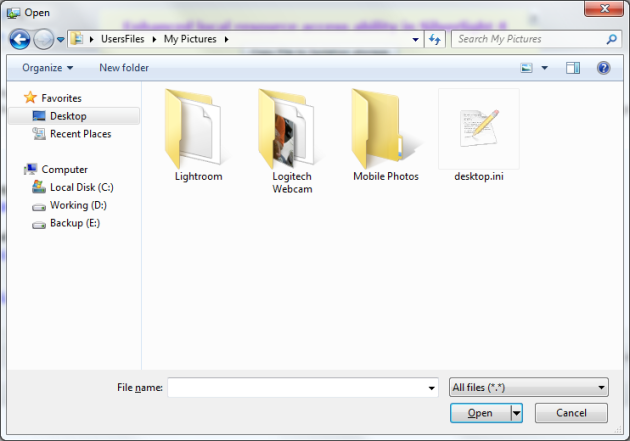
1. Clicks on Button – “Copy File to Isolated Storage acces”, a File open dialog will popup, screenshot below:
OpenFileDialog
Code behind to open file dialog:

            OpenFileDialog dlg = new OpenFileDialog { Filter = "All files (*.*)|*.*", Multiselect = true };
            var dlgResult = dlg.ShowDialog();

Read selected file(s) and copy them to isolated storage:

                IsolatedStorageFile iso = IsolatedStorageFile.GetUserStoreForApplication();
                foreach (FileInfo file in dlg.Files)
                {
                    using (Stream fileStream = file.OpenRead())
                    {
                        using (IsolatedStorageFileStream isoStream =
                            new IsolatedStorageFileStream(file.Name, FileMode.Create, iso))
                        {
                            // Read and write the data block by block until finish
                            while (true)
                            {
                                byte[] buffer = new byte[100001];
                                int count = fileStream.Read(buffer, 0, buffer.Length);
                                if (count > 0)
                                {
                                    isoStream.Write(buffer, 0, count);
                                }
                                else
                                {
                                    break;
                                }
                            }
                        }
                    }
                }

Code behind for “Load file from isolated storage”:


var isoFiles = from files in IsolatedStorageFile.GetUserStoreForApplication().GetFileNames()
                           select files;

2. Create a text file at “C:\WayneTestSL4Fso\WayneTest.txt”, please note: if you use System.IO.File to do such operation you won’t success, I guess it is because elevated trust is still not directly implemented in a lot of managed assemblies. Here in my demo I used Scripting.FileSystemObejct:

        private String folderPath = "C:\\WayneTestSL4FSO";
        private String filePath = "C:\\WayneTestSL4Fso\\WayneTest.txt";

        using (dynamic fso = AutomationFactory.CreateObject("Scripting.FileSystemObject"))
        {
            if (!fso.FolderExists(folderPath)) fso.CreateFolder(folderPath);
            dynamic txtFile = fso.CreateTextFile(filePath);
            txtFile.WriteLine("Some text...");
            txtFile.close();
        }

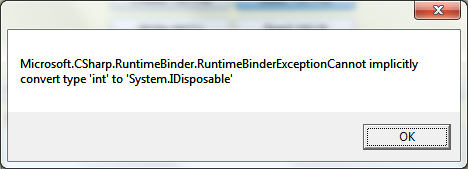
P.S. While I first time used “dynamic” keyword within a using statement, I was a little bit surprised, I can simply try to dispose a dynamic object without checking whether it has implemented IDisposible, hence I tried run using (dynamic x = 8 ), then I got thisSmile:
IncorrectUsing

OK, let’s back to the code implementation for reading the text file I just created,

                var fileContent = String.Empty;

                using (dynamic fso = AutomationFactory.CreateObject("Scripting.FileSystemObject"))
                {
                    dynamic file = fso.OpenTextFile(filePath);
                    fileContent = file.ReadAll();

                    file.Close();
                }

3. Registry write/read, please note: we can only have registry write permission to HKCU NOT HKLM, we have read permission to HKLM entries.

                using (dynamic wScript = AutomationFactory.CreateObject("WScript.Shell"))
                {
                    // Only has write permissin to HKCU
                    wScript.RegWrite(@"HKCU\Software\WayneTestRegValue",
                            "SomeStrValue", "REG_SZ");
                }
                using (dynamic wScript = AutomationFactory.CreateObject("WScript.Shell"))
                {
                    string dotNetRoot =
                        wScript.RegRead(@"HKLM\SOFTWARE\Microsoft\.NETFramework\InstallRoot");
                }

4. Run another local application

                using (dynamic wScript = AutomationFactory.CreateObject("WScript.Shell"))
                {
                    //Refer WScript.Run at: http://msdn.microsoft.com/en-us/library/d5fk67ky(v=VS.85).aspx
                    wScript.Run("iexplore http://wayneye.com", 1, true);
                }

Note 1: WScript.Shell.Run method can accepts not only executable files, but also accepts *.bat, Windows Script Host files (*.vbs, *.js) or PowerShell script files, etc.
Note 2: Intention to elevate more permission by running another exe or script file definitely won’t success, for example, if I try to invoke AccessKHLM.js below from my OOB application I will get a 80070005 error code that indicates access denied:

var WshShell = WScript.CreateObject("WScript.Shell");

WshShell.RegWrite("HKLM\\Software\\WayneTestValue\\", 1, "REG_BINARY");
WshShell.Close();

If you double click the Demo.js you will success since you are a Windows Administrator, while “Silverlight-based applications run in partial trust, which means they run within a security sandbox“, for more information please refer Trusted Application.

5. Phonate a sentence

    using (dynamic speechApi = AutomationFactory.CreateObject("Sapi.SpVoice"))
    {
        speechApi.Speak(this.txtPhonateSource.Text);
    }

6. Code to implement close button “X” appear on the upper-top corner.

    using (var wScript = AutomationFactory.CreateObject("WScript.Shell"))
    {
        wScript.Run(@"cmd /k taskkill /IM sllauncher.exe & exit", 0);
    }

This is a little bit tricky, I searched a while on google and found a great article Programmatically exit Silverlight 4 Out-of-browser application.  Essentially the code invokes WScript.Shell and runs cmd and terminate sllauncher.exe, so that our OOB process got killedSmile with tongue out.

Conclusion

With elevated trust for Silverlight OOB applications, we can do much more than ever, it give more confidence to develope Enterprise business applications using Silverlight technology, yesterday I saw Scott Guthrie posted a blog talking about Silverlight, he mentioned Microsoft will absolutely continue work hard on Silverlight for Enterprise Businees Applications (both online and OOB).

Source Code Download

Silverlight4ManipulateSystem.zip

References

How to: Configure an Application for Out-of-Browser Support
http://http://msdn.microsoft.com/en-us/library/dd833073(v=VS.95).aspx

How to Configure your Silverlight App to run in Elevated Trust Mode
http://blogs.silverlight.net/blogs/msnow/archive/2010/04/20/tip-of-the-day-112-how-to-configure-your-silverlight-app-to-run-in-elevated-trust-mode.aspx

Silverlight Tip of the Day #19: Using Isolated Storage
http://blogs.silverlight.net/blogs/msnow/archive/2008/07/16/tip-of-the-day-19-using-isolated-storage.aspx

File Explorer using Silverlight 4 COM Interoperability
http://www.codeproject.com/KB/silverlight/FileExplorerInSilverlight.aspx

WshShell Object
http://msdn.microsoft.com/en-us/library/aew9yb99(v=VS.85).aspx

Investigation on XUL

Due to my working requirement I spent several hours on Mozilla XUL, as I have many years experience on HTML, XML, CSS and JavaScript, the learning process is not very painful, I record my effort in this post, FMFI (for my future information~~Smile).

Definition

XUL (pronounced /?zu?l/ “zool”), the XML User Interface Language, is an XML user interface markup language developed by the Mozilla project. XUL operates in Mozilla cross-platform applications such as Firefox and Flock. The Mozilla Gecko layout engine provides an implementation of XUL used in the Firefox browser.[1]

I mainly learnt from Mozilla MDC and I summarized useful links below:

Wiki page: http://en.wikipedia.org/wiki/XUL
XULRunner MDC https://developer.mozilla.org/en/XULRunner
Getting started with XULRunner https://developer.mozilla.org/en/Getting_started_with_XULRunner
XUL References https://developer.mozilla.org/en/XUL_Reference
Debugging a XULRunner Application https://developer.mozilla.org/en/Debugging_a_XULRunner_Application

Hello World step by step

I am using Windows 7 Ultimate 64 Bit so I took Windows as example, XUL is definitely cross-platform (Mac, Linux).

  1. Download XULRunner for Windows from here: http://releases.mozilla.org/pub/mozilla.org/xulrunner/releases/
  2. Unzip the package to anywhere you want, I take “%UserProfile%\Desktop\XUL\XULRunner” for example.
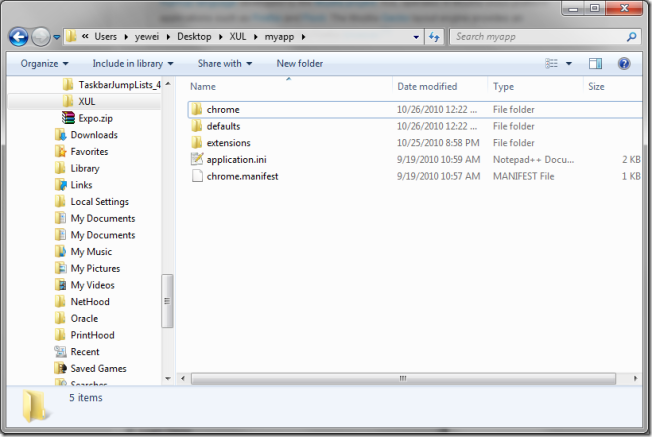
  3. Follow this Guide and download “myapp” under %UserProfile%\Desktop\XUL, screenshot below:
    XulMyapp
  4. Use any text editor open “%UserProfile%\Desktop\XUL\myapp\chrome\content\main.xul” and “%UserProfile%\Desktop\XUL\myapp\chrome\content\main.js”.
  5. Run XULRunner with parameter pointing to your application.ini to run this XUL instance.

    Invoke XULRunner from command line

All done, I show my simple demo code below:

Main.xul:

<?xml version="1.0"?>
<?xml-stylesheet href="chrome://global/skin/" type="text/css"?>
<?xml-stylesheet href="style.css" type="text/css"?>

<window id="main" title="Login Demo" width="400" height="300" xmlns="http://www.mozilla.org/keymaster/gatekeeper/there.is.only.xul">
  <script type="application/javascript" src="chrome://myapp/content/main.js"/>

  <caption label="Login Demo"/>
  <vbox>
    <lable value="User Name: "/>
    <textbox id="txtUid" maxwidth="400" maxlength="10" />
    <separator/>
    <lable value="Password: "/>
    <textbox type="password" id="txtPwd" maxlength="10" />
    <separator/>
    <button id="btnLogin" label="Login" oncommand="doLogin();" width="300" />
    <separator/>
    <label id="lbl" value=""  />
  </vbox>

  <separator />
</window>

main.js

function $(id) {
return document.getElementById(id);
}

function doLogin() {
var lbl = $("lbl");

lbl.value = "Your user name: " + $("txtUid").value + ", your password: " + $("txtPwd").value;
}

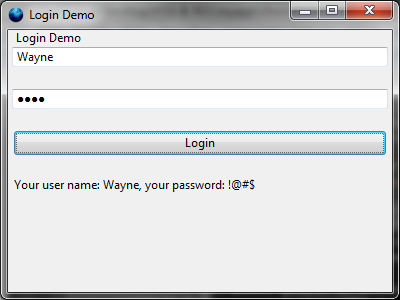
My XUL Demo

My XUL Demo

My XUL Demo

Happy coding:)

A complete Impersonation Demo in C#.NET

Under some scenarios we need impersonate another Windows account and do some work under that user’s session, for example:

  • An enterprise ASP.NET web application provides server administrators’ ability to access the server under some specific privilege set; Server admin input their NT account information (domain\account + password) on the page, we need get WinNT Access Token and then impersonate this server user, so that we acquire its specific privilege and do the things ONLY THIS ACCOUNT CAN DO.
  • We developed a Windows Service which needs internet access periodically, but a specific user sets an Sock5 proxy to access internet, then your Windows Service needs to know the Socks proxy information so that it could access internet, you must impersonate this user and read the settings.
  • Impersonation definition

    Definition copied from: http://msdn.microsoft.com/en-us/library/aa376391(VS.85).aspx

    Impersonation is the ability of a thread to execute using different security information than the process that owns the thread. Typically, a thread in a server application impersonates a client. This allows the server thread to act on behalf of that client to access objects on the server or validate access to the client’s own objects.

    I read many articles and blogs and wrote an ImpersonateHelper class to do impersonation work, during the investigating I noticed that very few articles/blogs refer a complete impersonation process, so I decided to write one that refer as more details as I can, and actually my code was a code snippet combination came from 10+ sourcesSmile.

    Functionality

    I create a local user: TempUser which belongs to “Administrators” (make sure log on TempUser at least once), I logged on as my own account and I am going to impersonate TempUser and do two things:

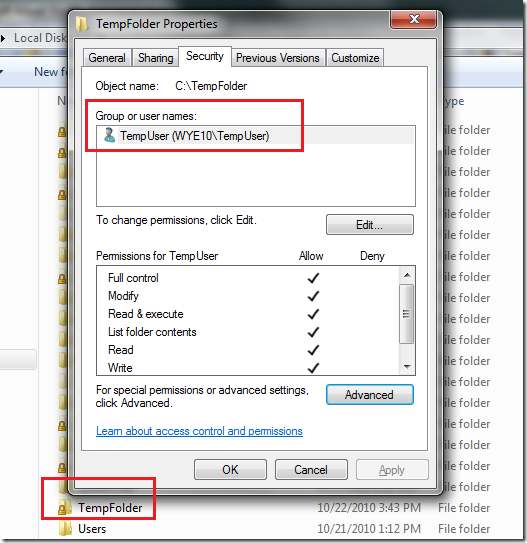
    1. Create a folder “C:\TempFolder”, modify its default privilege, ONLY TempUser has full control of it, I will create a text file under this folder after impersonating to prove impersonation is successfully.
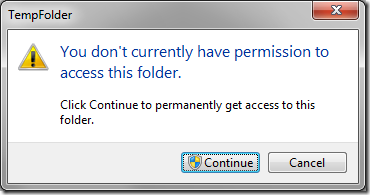
      Tempfolder1Notes: After setting TempUser as the only owner, my current account cannot access this folder except privilege promotion (I disabled UAC, if UAC is enabled, a prompt window will pop up and as for Admin confirm).
      Tempfolder2 

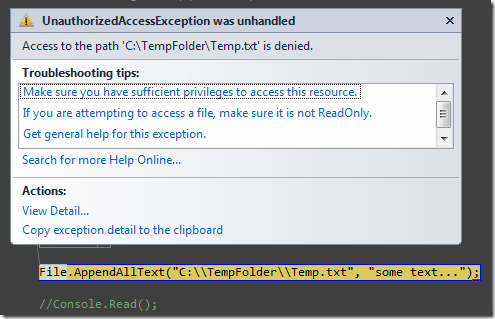
      In additional, I tried to access this folder programmatically under my account, UnauthorizedAccessException will be thrown!

      Unauthorized

    2. I will access TempUser’s HKEY_CURRENT_USER and do registry key creation, reading and deleting.

    Code Snippet

    We need invoke three very famous Win32 API: LogonUser, DuplicateToken and RevertToSelf.

            [DllImport("advapi32.dll")]
            public static extern int LogonUser(String lpszUserName,
                String lpszDomain,
                String lpszPassword,
                int dwLogonType,
                int dwLogonProvider,
                ref IntPtr phToken);
    
            [DllImport("advapi32.dll", CharSet = CharSet.Auto, SetLastError = true)]
            public static extern int DuplicateToken(IntPtr hToken, int impersonationLevel, ref IntPtr hNewToken);
    
            ///
            /// A process should call the RevertToSelf function after finishing any impersonation begun by using the DdeImpersonateClient, ImpersonateDdeClientWindow, ImpersonateLoggedOnUser, ImpersonateNamedPipeClient, ImpersonateSelf, ImpersonateAnonymousToken or SetThreadToken function.
            /// If RevertToSelf fails, your application continues to run in the context of the client, which is not appropriate. You should shut down the process if RevertToSelf fails.
            /// RevertToSelf Function: http://msdn.microsoft.com/en-us/library/aa379317(VS.85).aspx
            ///
            /// A boolean value indicates the function succeeded or not.
            [DllImport("advapi32.dll", CharSet = CharSet.Auto, SetLastError = true)]
            public static extern bool RevertToSelf();
    
            [DllImport("kernel32.dll", CharSet = CharSet.Auto, SetLastError = true)]
            public static extern bool CloseHandle(IntPtr handle);
    

    An important notes: in order to access HKCU, we need invoke another Win32 API: LoadUserProfile, to acquire the handle of HKCU under TempUser, code below, as I highlighted line 45 and 49, after invoking LoadUserProfile, hProfile will be set handle to HKCU:

        [StructLayout(LayoutKind.Sequential)]
        public struct ProfileInfo
        {
            ///
            /// Specifies the size of the structure, in bytes.
            ///
            public int dwSize;
    
            ///
            /// This member can be one of the following flags: PI_NOUI or PI_APPLYPOLICY
            ///
            public int dwFlags;
    
            ///
            /// Pointer to the name of the user.
            /// This member is used as the base name of the directory in which to store a new profile.
            ///
            public string lpUserName;
    
            ///
            /// Pointer to the roaming user profile path.
            /// If the user does not have a roaming profile, this member can be NULL.
            ///
            public string lpProfilePath;
    
            ///
            /// Pointer to the default user profile path. This member can be NULL.
            ///
            public string lpDefaultPath;
    
            ///
            /// Pointer to the name of the validating domain controller, in NetBIOS format.
            /// If this member is NULL, the Windows NT 4.0-style policy will not be applied.
            ///
            public string lpServerName;
    
            ///
            /// Pointer to the path of the Windows NT 4.0-style policy file. This member can be NULL.
            ///
            public string lpPolicyPath;
    
            ///
            /// Handle to the HKEY_CURRENT_USER registry key.
            ///
            public IntPtr hProfile;
        }
    
            [DllImport("userenv.dll", SetLastError = true, CharSet = CharSet.Auto)]
            public static extern bool LoadUserProfile(IntPtr hToken, ref ProfileInfo lpProfileInfo);
    
            [DllImport("Userenv.dll", CallingConvention = CallingConvention.Winapi, SetLastError = true, CharSet = CharSet.Auto)]
            public static extern bool UnloadUserProfile(IntPtr hToken, IntPtr lpProfileInfo);
    

    Code to execute impersonation:

    WindowsIdentity m_ImpersonatedUser;
                IntPtr token = IntPtr.Zero;
                IntPtr tokenDuplicate = IntPtr.Zero;
                const int SecurityImpersonation = 2;
                const int TokenType = 1;
    
                try
                {
                    if (RevertToSelf())
                    {
                        Console.WriteLine("Before impersonation: " +
                                          WindowsIdentity.GetCurrent().Name);
    
                        String userName = "TempUser";
                        IntPtr password = GetPassword();
    
                        if (LogonUser(userName, Environment.MachineName, "!@#$QWERasdf", LOGON32_LOGON_INTERACTIVE,
                                      LOGON32_PROVIDER_DEFAULT, ref token) != 0)
                        {
                            if (DuplicateToken(token, SecurityImpersonation, ref tokenDuplicate) != 0)
                            {
                                m_ImpersonatedUser = new WindowsIdentity(tokenDuplicate);
                                using (m_ImpersonationContext = m_ImpersonatedUser.Impersonate())
                                {
                                    if (m_ImpersonationContext != null)
                                    {
                                        Console.WriteLine("After Impersonation succeeded: " + Environment.NewLine +
                                                          "User Name: " +
                                                          WindowsIdentity.GetCurrent(TokenAccessLevels.MaximumAllowed).Name +
                                                          Environment.NewLine +
                                                          "SID: " +
                                                          WindowsIdentity.GetCurrent(TokenAccessLevels.MaximumAllowed).User.
                                                              Value);
    
                                        #region LoadUserProfile
                                        // Load user profile
                                        ProfileInfo profileInfo = new ProfileInfo();
                                        profileInfo.dwSize = Marshal.SizeOf(profileInfo);
                                        profileInfo.lpUserName = userName;
                                        profileInfo.dwFlags = 1;
                                        Boolean loadSuccess = LoadUserProfile(tokenDuplicate, ref profileInfo);
    
                                        if (!loadSuccess)
                                        {
                                            Console.WriteLine("LoadUserProfile() failed with error code: " +
                                                              Marshal.GetLastWin32Error());
                                            throw new Win32Exception(Marshal.GetLastWin32Error());
                                        }
    
                                        if (profileInfo.hProfile == IntPtr.Zero)
                                        {
                                            Console.WriteLine(
                                                "LoadUserProfile() failed - HKCU handle was not loaded. Error code: " +
                                                Marshal.GetLastWin32Error());
                                            throw new Win32Exception(Marshal.GetLastWin32Error());
                                        }
                                        #endregion
    
                                        CloseHandle(token);
                                        CloseHandle(tokenDuplicate);
    
                                        // Do tasks after impersonating successfully
                                        AccessFileSystem();
    
                                        // Access HKCU after loading user's profile
                                        AccessHkcuRegistry(profileInfo.hProfile);
    
                                        // Unload user profile
                                        // MSDN remarks http://msdn.microsoft.com/en-us/library/bb762282(VS.85).aspx
                                        // Before calling UnloadUserProfile you should ensure that all handles to keys that you have opened in the
                                        // user's registry hive are closed. If you do not close all open registry handles, the user's profile fails
                                        // to unload. For more information, see Registry Key Security and Access Rights and Registry Hives.
                                        UnloadUserProfile(tokenDuplicate, profileInfo.hProfile);
    
                                        // Undo impersonation
                                        m_ImpersonationContext.Undo();
                                    }
                                }
                            }
                            else
                            {
                                Console.WriteLine("DuplicateToken() failed with error code: " + Marshal.GetLastWin32Error());
                                throw new Win32Exception(Marshal.GetLastWin32Error());
                            }
                        }
                    }
                }
                catch (Win32Exception we)
                {
                    throw we;
                }
                catch
                {
                    throw new Win32Exception(Marshal.GetLastWin32Error());
                }
                finally
                {
                    if (token != IntPtr.Zero) CloseHandle(token);
                    if (tokenDuplicate != IntPtr.Zero) CloseHandle(tokenDuplicate);
    
                    Console.WriteLine("After finished impersonation: " + WindowsIdentity.GetCurrent().Name);
                }
    

    AccessFileSystem method

            private static void AccessFileSystem()
            {
                // Access file system %appdata% will be "C:\Users\TempUser\appdata\Roaming"
                String appDataPath = Environment.GetFolderPath(Environment.SpecialFolder.ApplicationData);
                File.AppendAllText("C:\\TempFolder\\Temp.txt", "some text...");
            }
    

    AccessHkcuRegistry method

            private static void AccessHkcuRegistry(IntPtr hkcuHandle)
            {
                // Access registry HKCU
                using (SafeRegistryHandle safeHandle = new SafeRegistryHandle(hkcuHandle, true))
                {
                    using (RegistryKey tempUserHKCU = RegistryKey.FromHandle(safeHandle))
                    {
                        // Unum all sub keys under tempuser's HKCU
                        String[] keys = tempUserHKCU.GetSubKeyNames();
    
                        // Create a new sub key under tempuser's HKCU
                        using (RegistryKey tempKeyByWayne = tempUserHKCU.CreateSubKey("TempKeyByWayne"))
                        {
                            // Ensure priviledge
                            //RegistrySecurity registrySecurity = new RegistrySecurity();
                            //RegistryAccessRule accessRule = new RegistryAccessRule(Environment.MachineName + "\\" + userName,
                            //                                                       RegistryRights.TakeOwnership,
                            //                                                       InheritanceFlags.ContainerInherit,
                            //                                                       PropagationFlags.None,
                            //                                                       AccessControlType.Allow);
                            //registrySecurity.SetAccessRule(accessRule);
                            //tempKeyByWayne.SetAccessControl(registrySecurity);
    
                            // Create a new String value under created TempKeyByWayne subkey
                            tempKeyByWayne.SetValue("StrType", "TempContent", RegistryValueKind.String);
    
                            // Read the value
                            using (RegistryKey regKey = tempUserHKCU.OpenSubKey("TempKeyByWayne"))
                            {
                                String valueContent = regKey.GetValue("StrType") as String;
                                Console.WriteLine(valueContent);
                            }
    
                            // Delete created TempKeyByWayne subkey
                            tempUserHKCU.DeleteSubKey("TempKeyByWayne");
                            tempKeyByWayne.Close();
                        }
                    }
                }
            }
    

    Impersonation result and verification

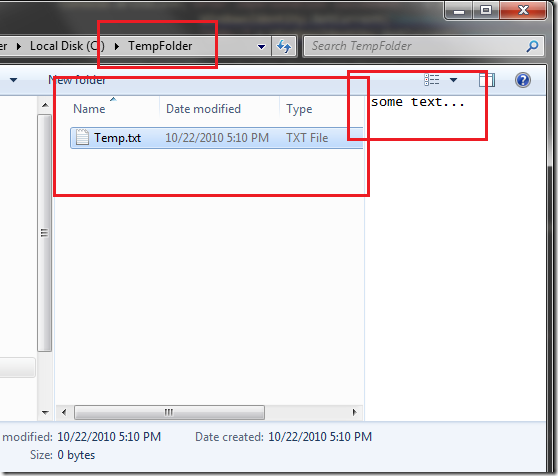
    Temp.txt was created.
    TempFolder

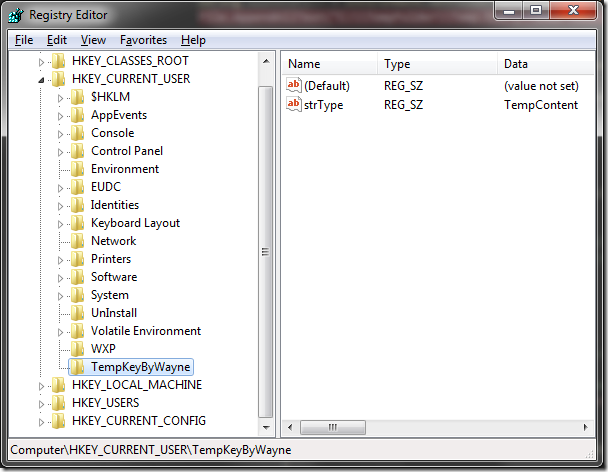
    “TempKeyByWayne” was created under HKCU.
    Registry

    Complete source code download

    References

    How to implement impersonation in an ASP.NET application
    http://support.microsoft.com/kb/306158

    LogonUser Win32 API
    http://msdn.microsoft.com/en-us/library/aa378184(VS.85).aspx

    How to spawn a process that runs under the context of the impersonated user in Microsoft ASP.NET pages
    http://support.microsoft.com/kb/889251

    ASP.NET Impersonation
    http://msdn.microsoft.com/en-us/library/xh507fc5(v=VS.100).aspx

    Safely Impersonating Another User
    http://blogs.msdn.com/b/shawnfa/archive/2005/03/22/400749.aspx

    Original post permalink: http://wayneye.com/Blog/DotNet-Impersonation-Demo